距离上一次完整写 Qt 相关的东西已经过去了整整 5 年,上一次写 Qt 时还是使用 Qt Widget,然而现在已经开始推 Qt Quike,并使用 QML 来替换 Widget 组织 UI 结构了。但因切换 CMake 作为构建工具,思维上还是没转换过来为什么 Qt Creator 作为一个 IDE,工程目录没法直接映射。
实现过程
基于【███】████ - QML实战(下文称“文档”)之上完成。但该文档中屏蔽掉了较多细节,且有些地方描述得也不是很清晰,中间迷糊了好几次,对完全的新手有些不友好,也咨询一些做过该 demo 的同学,给到的答复是“这已经比我当初看的时候好很多啦!”“大部分的东西还是需要自己去探索”。
拿到这个结论后就可以明确了对这个文档有些虎头蛇尾的感受,确实“有意为之”,让新同学们自己独立起来 !那么就来看看具体的实现过程吧。
功能点
在文档中的 demo 基础上拓展了一部分我个人相对感兴趣的点,如“右键菜单”和“窗体缩放”等,具体的功能点有:
播放区
- 视频播放/暂停
- 快进/快退 3s
素材区
- 拖拽添加单个/多个素材。
- 鼠标
- 图片圆角
其它
- 窗体拖拽
工程配置
CMake
刚开始的工程配置就给了一个下马威,先是纠结了一番如何组织 .h 和 .cpp 文件,按照原先的习惯,只要是一个独立的模块,不管是 UI 还是 model 都会单独拎出来一个文件夹。
按照文档中的说明,选择了 CMake 作为工程构建工具,在左侧目录上右键创建 C++ 类却无法自动添加到工程目录中,需要我们手动在 CMakeLists.txt 加上相关的逻辑。
1
2
3
4
5
6
7
8
9
10
11
12
13
14
15
16
17
18
19
20
21
22
23
24
25
26
27
28
29
30
31
32
33
34
35
36
37
38
39
40
41
42
| cmake_minimum_required(VERSION 3.16)
project(PlayerDemo VERSION 0.1 LANGUAGES CXX)
set(CMAKE_AUTOMOC ON)
set(CMAKE_CXX_STANDARD_REQUIRED ON)
set(CMAKE_AUTORCC ON)
set(CMAKE_AUTOUIC ON)
find_package(Qt6 6.2 COMPONENTS Quick REQUIRED)
find_package(Qt6 6.2 COMPONENTS Multimedia REQUIRED)
file(GLOB_RECURSE source_files *.c *.cpp)
file(GLOB_RECURSE header_files *.h *.hpp)
include_directories(${header_files})
qt_add_executable(appPlayerDemo
main.cpp
qml.qrc
${source_files}
${header_files}
)
#qt_add_qml_module(appPlayerDemo
# URI PlayerDemo
# VERSION 1.0
# QML_FILES main.qml
#)
set_target_properties(appPlayerDemo PROPERTIES
MACOSX_BUNDLE_GUI_IDENTIFIER my.example.com
MACOSX_BUNDLE_BUNDLE_VERSION ${PROJECT_VERSION}
MACOSX_BUNDLE_SHORT_VERSION_STRING ${PROJECT_VERSION_MAJOR}.${PROJECT_VERSION_MINOR}
MACOSX_BUNDLE TRUE
WIN32_EXECUTABLE TRUE
)
target_compile_definitions(appPlayerDemo
PRIVATE $<$<OR:$<CONFIG:Debug>,$<CONFIG:RelWithDebInfo>>:QT_QML_DEBUG>)
target_link_libraries(appPlayerDemo
PRIVATE Qt6::Quick Qt6::Multimedia)
|
以上内容中需要重点关注的是:
1
2
| file(GLOB_RECURSE source_files *.c *.cpp)
file(GLOB_RECURSE header_files *.h *.hpp)
|
自动索引当前目录下所有文件夹中的 .c、.cpp、.h、.hpp 文件,最后通过 qt_add_executable 添加到工程目录中。
如果这是纯手动工程,如使用 VSCode 来进行这么“原始”的操作过程能理解,但已经是一个 IDE,确实不太理解为什么在 IDE 中创建工程不能自动的做到文件索引。
QRC
QRC 是 Qt Creator 中推荐的资源管理方式。这也是不理解的地方,如果是推荐的话,为什么不能够在使用 Qt Creator 的情况下做一些默认行为呢?如果是可选的话,但在后续的 qml 相关文件中对资源的获取又是默认 qrc 方式引用的,我理解的话,既然是可选的是不是应该以“本地引用”的方式为准?
按照文档中的步骤,需要我们手动在 Qt Creator 中创建出 qrc 资源关键文件,并在其中添加进所有的 qml 和图片资源文件。
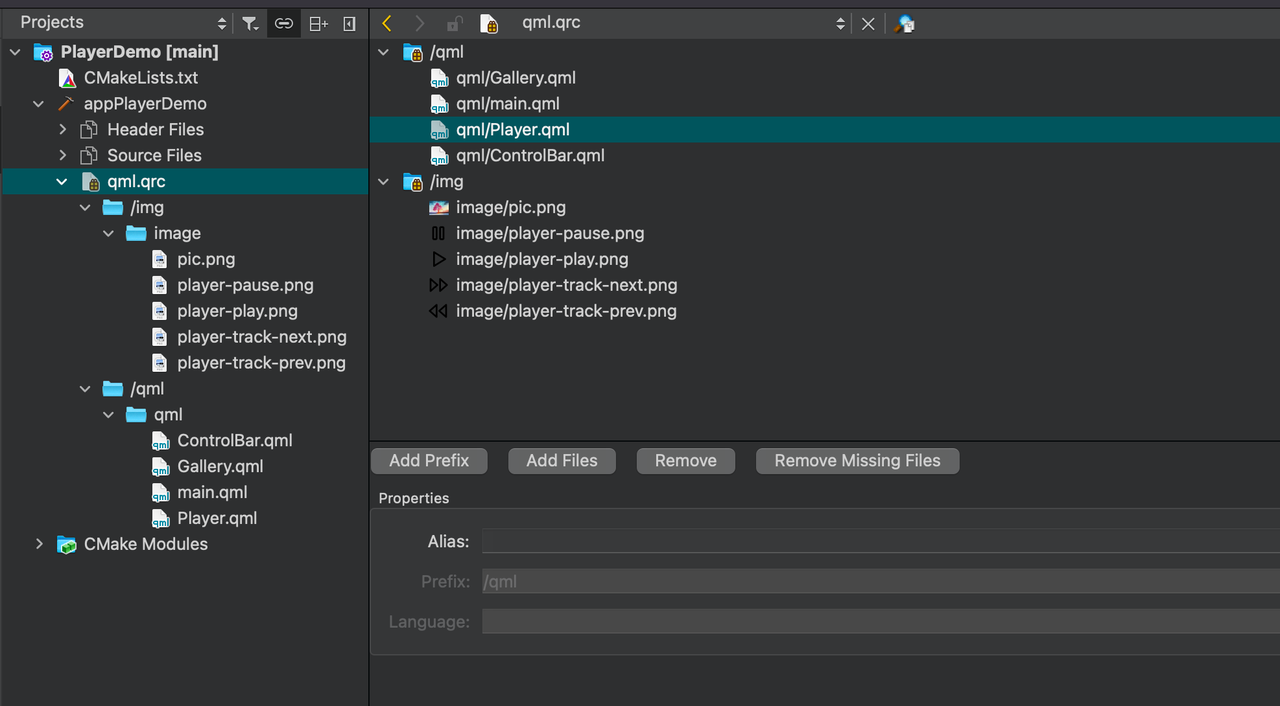
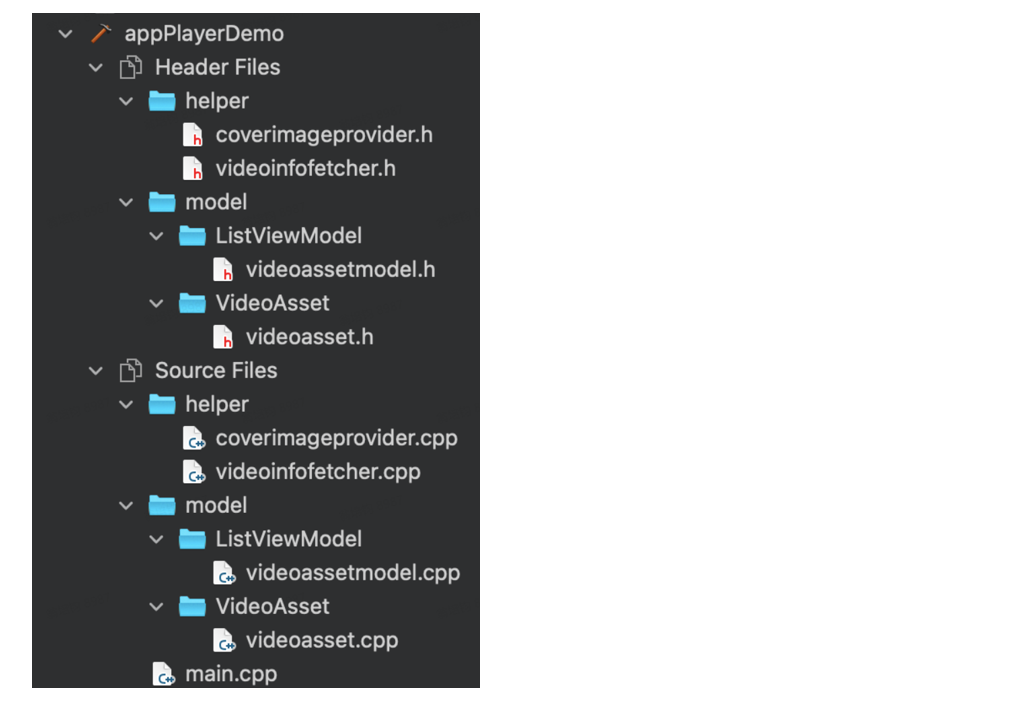
实际工程目录结构如下:
1
2
3
4
5
6
7
8
9
10
11
12
13
14
15
16
17
18
19
20
21
22
23
24
25
| .
├── CMakeLists.txt
├── helper
│ ├── coverimageprovider.cpp
│ ├── coverimageprovider.h
│ ├── videoinfofetcher.cpp
│ └── videoinfofetcher.h
├── image
│ ├── pic.png
│ ├── .....
│ └── player-track-prev.png
├── main.cpp
├── model
│ ├── ListViewModel
│ │ ├── videoassetmodel.cpp
│ │ └── videoassetmodel.h
│ └── VideoAsset
│ ├── videoasset.cpp
│ └── videoasset.h
├── qml
│ ├── ControlBar.qml
│ ├── Gallery.qml
│ ├── Player.qml
│ └── main.qml
└── qml.qrc
|
这里也有困惑的地方,按照上图中的文件树 .cpp 和 .h 都在一个文件夹中,但不知道为何 Qt Creator 要单独拆分出 Header Files 和 Source Files。是 CMakeLists.txt 中分开索引了头文件和实现文件?
功能区划分
之前未写过任何的桌面应用,在当初使用 FCPX 时就对这种多功能区划分的布局感兴趣,但按照 AppleOS 那一套开发流程,在 iPadOS 上通过 UISplitViewController 来完成左右分栏这种较为固定的分栏方式,灵活度不大。
文档中引导通过 Rectangle 自行划分功能区的方式第一次见,非常不错!在此基础上做了对齐一部分剪映专业版的 UI 增加了部分 margin 和圆角。
1
2
3
4
5
6
7
8
9
10
11
12
13
14
15
16
17
18
19
20
21
22
23
24
25
26
27
28
29
30
31
32
33
| Window {
width: 640
height: 400
visible: true
title: qsTr("VideoEditorPlayer")
color: "black"
minimumWidth: 640
minimumHeight: 400
Player {
id: player
height: parent
anchors.top: parent.top
anchors.bottom: parent.bottom
anchors.right: gallery.left
anchors.left: parent.left
anchors.rightMargin: 10
anchors.margins: 10
}
Gallery {
id: gallery
width: 175
height: parent
anchors.top: parent.top
anchors.bottom: parent.bottom
anchors.right: parent.right
anchors.margins: 10
onSelectedVideo:(videoUrl) => {
player.playWithVideoUrl(videoUrl)
}
}
}
|
通过不同 QML 文件组织不同的 UI 组件,如果都在同一个 qrc 目录下可以直接使用不需要 import。
素材区
素材区整体使用的是 GridView,可以同等认为是 UICollectionView。在实际开发过程中,GridView 和 Cell Component 是要分隔开在不同 qml 文件中的,这里比较奇怪的是,看上去 QML 在 GridView 设置子组件 delegate 有默认参数,如相关的 index 等,可以不用显式的设置直接使用即可。
一般来说,UI 和数据源进行分离是“公理”,而在 QML 中尽可能少的使用 JS 而是使用 C++ 与 QML 交互也是 Qt 里的“公理”,但写着写着就发现如果纯粹是收敛在 QML 中的 UI 展示逻辑,确实 JS 会越写越多,慢慢的,与 C++ 的交互过程就变为了纯粹的数据交换。
需要在手动在注册对应的 C++ model 暴露给 QML 的属性:
1
2
3
4
5
6
7
8
9
10
11
12
13
14
15
16
17
18
19
20
21
22
23
24
25
26
27
|
int VideoAssetModel::rowCount(const QModelIndex &parent) const
{
if (parent.isValid())
return 0;
return m_datas.count();
}
QVariant VideoAssetModel::data(const QModelIndex &index, int role) const
{
if (!index.isValid())
return QVariant();
return QVariant::fromValue(m_datas[index.row()].data());
}
QHash<int, QByteArray> VideoAssetModel::roleNames() const
{
QHash<int, QByteArray> hash;
hash[0] = "asset";
return hash;
}
qmlRegisterType<VideoAssetModel>("com.pjhubs.asset", 1, 0, "VideoAssetModel");
|
其中,“asset”是是作为 VideoAssetModel 在 QML 中的属性别名,直接标记为当前 index 下关联的 AssetModel 实例,可直接通过别名在 QML 中使用。
1
2
3
4
5
6
7
8
9
10
11
12
13
14
15
16
17
18
19
20
21
22
23
24
25
| Rectangle {
VideoAssetModel {
id: videoModel
}
Component {
id: cell
Column {
Image {
id: coverImg
source: asset.coverImage
}
Text {
id: coverTitle
text: asset.name
}
}
}
GridView {
model: videoModel
delegate: cell
}
}
|
给 QML 中使用的成员变量需要加上 Q_PROPERTY 进行修饰:
1
2
3
4
|
Q_PROPERTY(QString name READ name CONSTANT)
Q_PROPERTY(QString url READ url CONSTANT)
Q_PROPERTY(QString coverImage READ coverImage CONSTANT)
|
给 QML 中调用的方法需要加上 Q_INVOKABLE 进行修饰:
1
2
3
4
5
|
Q_INVOKABLE void addVideos(const QString &urls);
Q_INVOKABLE void removeVideo(int index);
Q_INVOKABLE void loadAssets();
Q_INVOKABLE QString urlAt(int position);
|
数据源处理完后,我们来看 UI。按照文档中的意思做到这一部就可以了,但我还是想着把对封面的圆角给加上,当初以为给 Image 组件加圆角直接设置 radius 或者再套一个 Rectangle 就可以了,谁知这一试才发现并不简单。
Image 组件没有 radius 属性,套了 Rectangle 后因为无法“裁切”适应导致 Rectangle 的圆角生效了,但 Image 组件没生效。搜了搜资料,发现大家都在使用 Qt5 的 OpacityMask 组件完成,但这个组件在 Qt6 中又被移除了,不作为自带组件集成在 Qt6 中。
这般在 Qt6 中一定会有推荐的圆角设置方法,再探索一番后发现搜到的方法均不可用。最后还是重新打开 MaintenanceTool 下回了 Qt5 的相关组件。
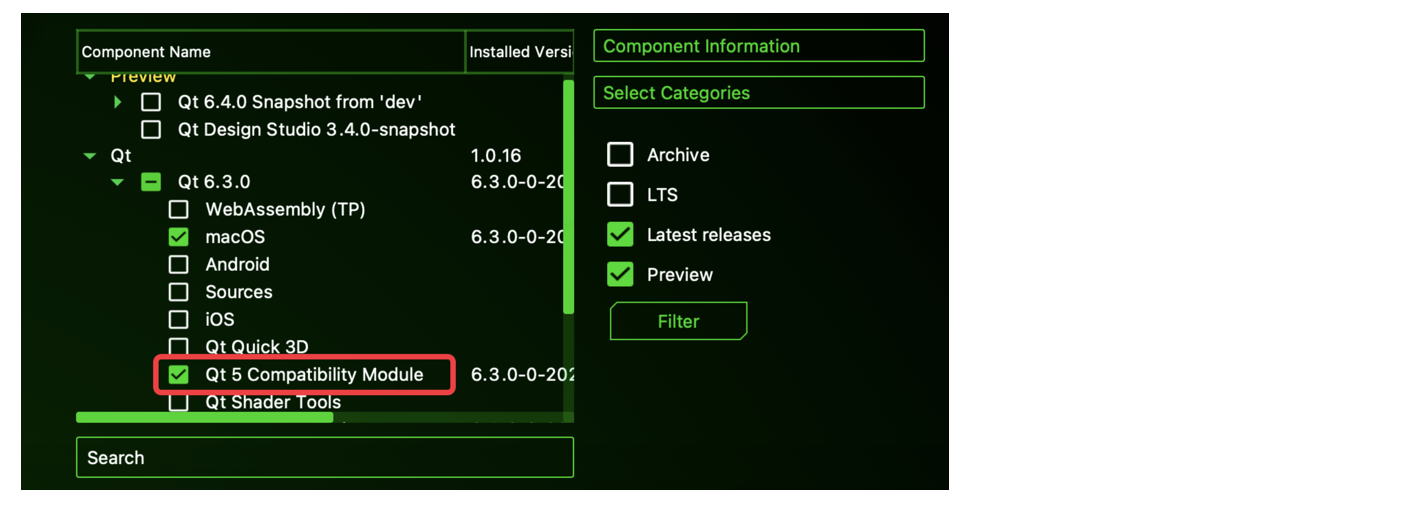
下载完成后在 QML 文件中即可使用:
1
2
3
4
5
6
7
8
9
10
11
12
13
14
15
16
17
18
19
20
21
22
23
24
25
26
27
28
29
30
31
32
33
34
35
36
37
38
39
40
41
42
43
| import Qt5Compat.GraphicalEffects
Rectangle {
VideoAssetModel {
id: videoModel
}
Component {
id: cell
Column {
Image {
source: asset.coverImage
visible: false
}
Rectangle {
id: coverContainer
visible: false
}
OpacityMask {
id: mask
width: parent.width
height: coverImg.height
source: coverImg
maskSource: coverContainer
}
Text {
id: coverTitle
text: asset.name
}
}
}
GridView {
id: listView
model: videoModel
delegate: cell
Component.onCompleted: {
videoModel.loadAssets()
}
}
}
|
素材区的基本 UI 都已完成,再回到数据源上。对于一个简单的素材区来说,支持素材的添加、删除和数据持久化是必然的。前文也已说到,与数据源相关的操作都依赖于 C++ 完成,完整的 VideoAssetmodel 类如下:
1
2
3
4
5
6
7
8
9
10
11
12
13
14
15
16
17
18
19
20
21
22
23
24
25
26
27
28
29
30
31
| #ifndef VIDEOASSETMODEL_H
#define VIDEOASSETMODEL_H
#include <QAbstractListModel>
#include <QList>
#include "../VideoAsset/videoasset.h"
class VideoAssetModel : public QAbstractListModel
{
Q_OBJECT
public:
explicit VideoAssetModel(QObject *parent = nullptr);
Q_INVOKABLE void addVideos(const QString &urls);
Q_INVOKABLE void removeVideo(int index);
Q_INVOKABLE void loadAssets();
Q_INVOKABLE QString urlAt(int position);
int rowCount(const QModelIndex &parent = QModelIndex()) const override;
QVariant data(const QModelIndex &index, int role = Qt::DisplayRole) const override;
QHash<int, QByteArray> roleNames() const override;
private:
QList<QSharedPointer<VideoAsset>> m_datas;
QString fileName(const QString urlString);
void storeAssets();
};
#endif
|
1
2
3
4
5
6
7
8
9
10
11
12
13
14
15
16
17
18
19
20
21
22
23
24
25
26
27
28
29
30
31
32
33
34
35
36
37
38
39
40
41
42
43
44
45
46
47
48
49
50
51
52
53
54
55
56
57
58
59
60
61
62
63
64
65
66
67
68
69
70
71
72
73
74
75
76
77
78
79
80
81
82
83
84
85
86
87
88
89
90
91
92
93
94
95
96
97
98
99
100
101
| #include "videoassetmodel.h"
#include "../../helper/videoinfofetcher.h"
#include <QFile>
#include <QDir>
VideoAssetModel::VideoAssetModel(QObject *parent)
: QAbstractListModel(parent)
{
}
void VideoAssetModel::addVideos(const QString &urls)
{
QList<QString> urlArr = QList<QString>();
urlArr.append(urls);
if (urls.contains(",")) {
urlArr = urls.split(",");
}
auto rowCount = m_datas.count();
beginInsertRows(QModelIndex(), rowCount, rowCount + urlArr.count() - 1);
int coverImageCount = 0;
foreach(QString url, urlArr) {
QString urlFileName = fileName(url);
VideoInfoFetcher::fetchFirstFrameWithVideoUrl(url, [=, &coverImageCount] (const QImage &coverImage) {
QString coverDirPath = QDir::currentPath() + "/cover_image";
QDir dir;
if (!dir.exists(coverDirPath)) {
dir.mkdir(coverDirPath);
}
QString coverImageFilePath = QDir::currentPath() + "/cover_image/" + urlFileName + ".jpg";
coverImage.save(coverImageFilePath, "jpg", -1);
auto asset = QSharedPointer<VideoAsset>(new VideoAsset(urlFileName, url, "file://" + coverImageFilePath));
m_datas.append(asset);
coverImageCount += 1;
if ((coverImageCount == urlArr.count() - 1) || urlArr.count() == 1) {
storeAssets();
endInsertRows();
}
});
}
}
QString VideoAssetModel::fileName(const QString urlString) {
QStringList strings = urlString.split("/");
return strings.last().split(".").first();
}
void VideoAssetModel::removeVideo(int index)
{
beginRemoveRows(QModelIndex(), index, index);
m_datas.removeAt(index);
endRemoveRows();
storeAssets();
}
void VideoAssetModel::loadAssets()
{
QFile file("playlist.dat");
if (file.open(QIODevice::ReadOnly | QIODevice::ExistingOnly)) {
QDataStream in(&file);
int num;
in >> num;
beginInsertRows(QModelIndex(), 0, num - 1);
for (int i = 0; i < num; i++) {
auto asset = QSharedPointer<VideoAsset>(new VideoAsset);
asset->read(in);
m_datas.append(asset);
}
endInsertRows();
}
}
QString VideoAssetModel::urlAt(int position)
{
return m_datas.at(position)->url();
}
void VideoAssetModel::storeAssets() {
QFile file("playlist.dat");
if (file.open(QIODevice::WriteOnly)) {
QDataStream out(&file);
int num = m_datas.count();
out << num;
for (int i = 0; i < num; i++) {
m_datas[i]->write(out);
}
}
}
|
标记每一个素材资源的 Model 类 VideoAsset 如下:
1
2
3
4
5
6
7
8
9
10
11
12
13
14
15
16
17
18
19
20
21
22
23
24
25
26
| class VideoAsset : public QObject
{
Q_OBJECT
Q_PROPERTY(QString name READ name CONSTANT)
Q_PROPERTY(QString url READ url CONSTANT)
Q_PROPERTY(QString coverImage READ coverImage CONSTANT)
public:
explicit VideoAsset(QObject *parent = nullptr);
VideoAsset(const QString &name, const QString &url, const QString &coverImage);
const QString &name() const;
const QString &url() const;
const QString &coverImage() const;
const QDataStream &read(QDataStream &in);
const QDataStream &write(QDataStream &out);
const void setCoverImageUrl(const QString coverImageUrl);
signals:
private:
QString m_name;
QString m_url;
QString m_coverImage;
};
|
在获取素材的首帧图这里绕了一个大圈,也有可能是我没理解文档中的方法。大致的思路是通过 Qt 的 QMediaPlayer 组件,单例一个播放器 sharedPlayer,每次外界通过调用播放器播放 play 方法,并通过监听帧变化来获取到第一帧,回调给业务方。
这里我遇到了两个问题,第一个是不知道把生成的 QImage 存在哪里。第二个是 sharedPlayer 播放器单例对象在循环调用场景下会自动停止当前任务,如果我们循环调用四次,让播放器生成四个视频资源的首帧,但因为单例的因素导致只有最后一次播放行为被执行。
第一个问题主要是文档说明了可以通过 QQuickImageProvider 的方式管理图片资源,但经过我的一番尝试后依旧没理解其中的使用方式,后来沿用了之前的思维。既然已经拿到了图片实例,应该保存在 app 沙盒内,让 Image 组件直接加载沙盒路径图片。
1
2
3
4
5
6
7
8
9
10
11
| QString coverDirPath = QDir::currentPath() + "/cover_image";
QDir dir;
if (!dir.exists(coverDirPath)) {
dir.mkdir(coverDirPath);
}
QString coverImageFilePath = QDir::currentPath() + "/cover_image/" + urlFileName + ".jpg";
coverImage.save(coverImageFilePath, "jpg", -1);
auto asset = QSharedPointer<VideoAsset>(new VideoAsset(urlFileName, url, "file://" + coverImageFilePath));
m_datas.append(asset);
|
需要注意的是,如果对资源并不采用 qrc 进行管理,则需要手动在路径前拼上 file:// 转化为本地路径。
第二个问题最开始想着是保持稳定中所给到的方法,继续沿用单例播放器的方式进行,只是问题出在了循环执行上,通过串行队列或者加锁等待的方式即可,这里我最开始使用的是加锁等待,下意识的出现了 OC 中的 barrier,简单好用,但经一番搜索未果,C++ 的加锁还需学习。最终的结局方案为去除播放器单例,每次拖拽视频资源到素材区触发取首帧逻辑时都创建新的播放器。
1
2
3
4
5
6
7
8
9
10
11
12
13
14
15
16
17
18
| bool VideoInfoFetcher::fetchFirstFrameWithVideoUrl(const QString &url, std::function<void (const QImage &)> callback)
{
auto player = new QMediaPlayer();
player->setSource(QUrl(url));
auto sink = new QVideoSink;
player->setVideoSink(sink);
QObject::connect(sink, &QVideoSink::videoFrameChanged, player, [=] (const QVideoFrame &frame) {
if (frame.isValid()) {
player->stop();
callback(frame.toImage());
delete player;
}
}, Qt::QueuedConnection);
player->play();
return true;
}
|
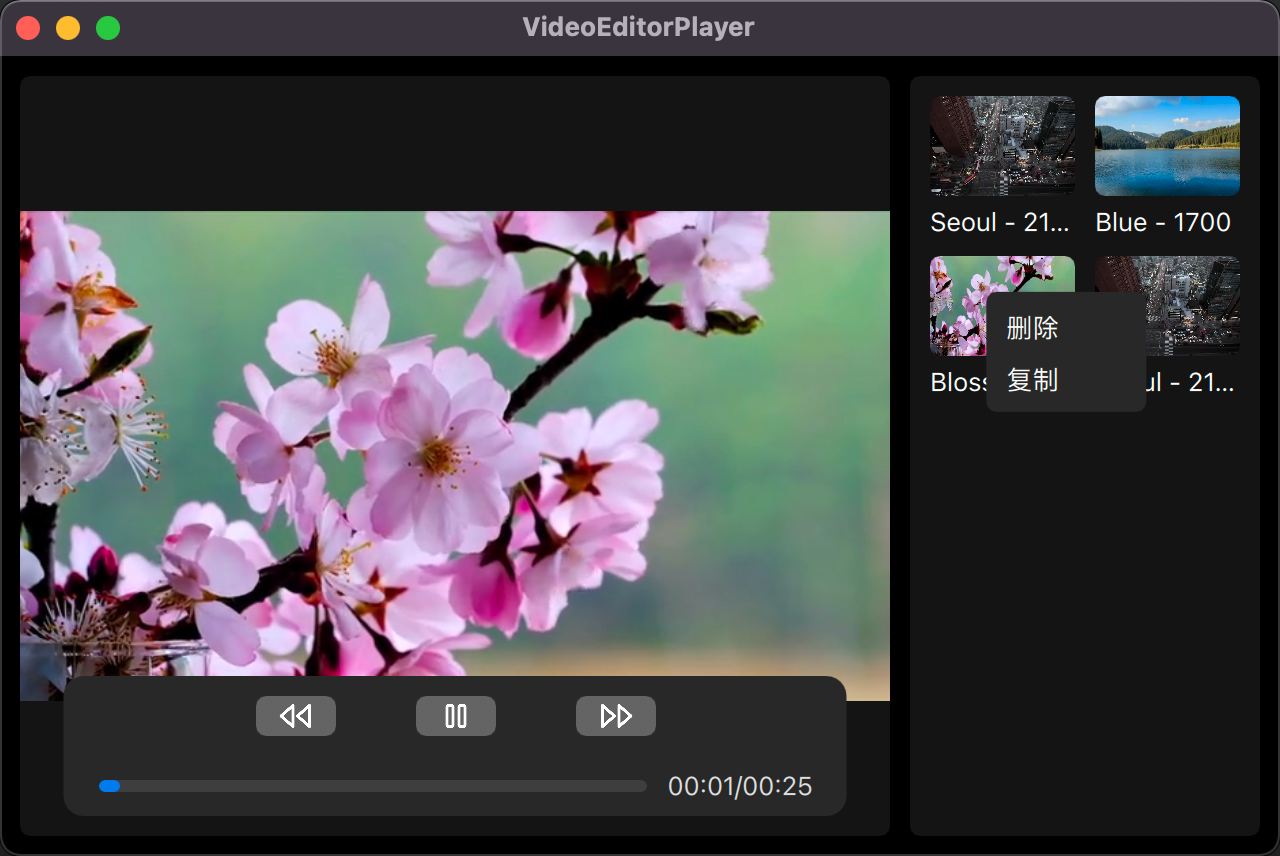
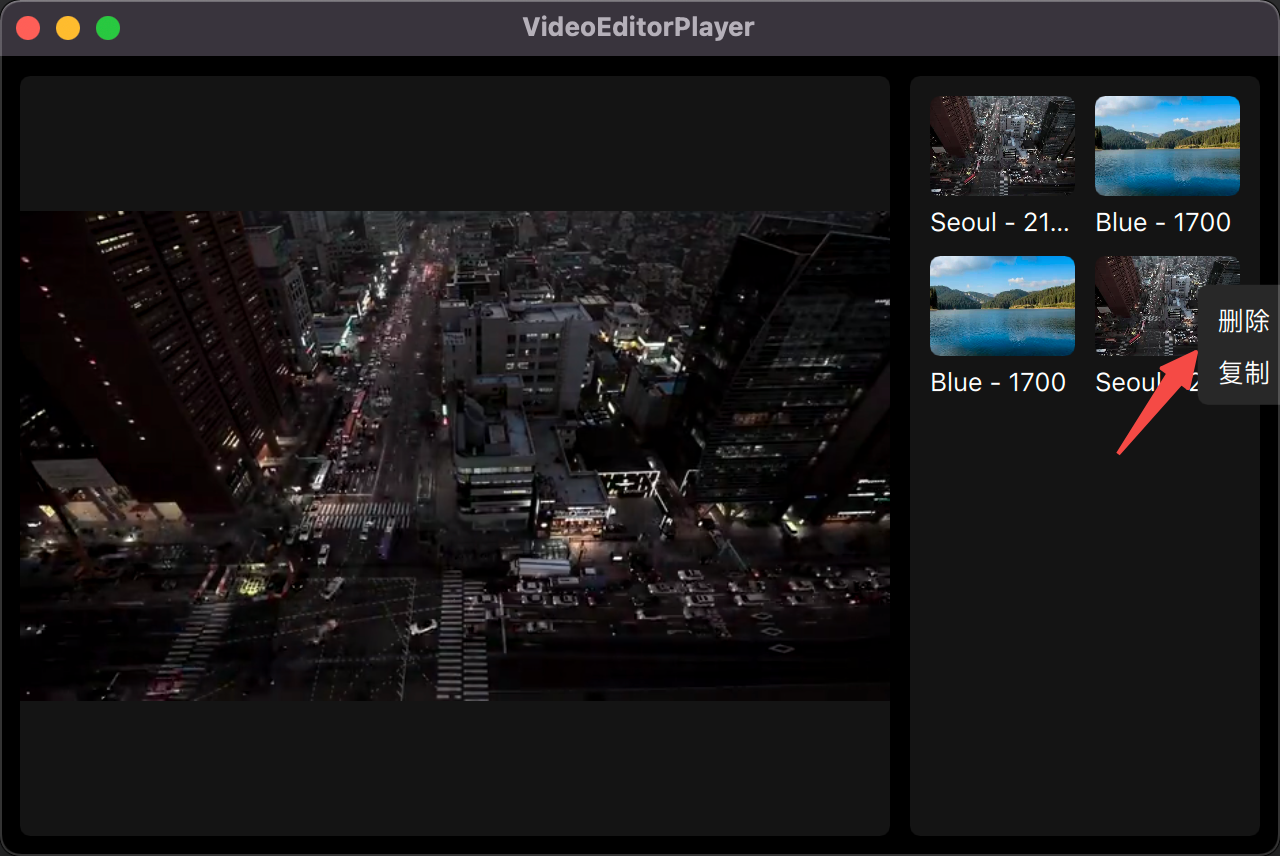
至此,完成了文档中所要求的素材区 UI 和基本操作逻辑,但我在此基础上额外添加了“右键更多菜单”,主要是之前在移动端上的更多菜单都是长按,想尝试一下全新的操作方式。
我没有查过 Qt 是否本身支持“菜单”组件,写到这里时也是下意识的冒出了可以继续使用 rectangle 自定义出一个更多菜单,文档中只要求了“右键删除”,这里的右键菜单多了一个复制功能,复用 addVideo 方法。
1
2
3
4
5
6
7
8
9
10
11
12
13
14
15
16
17
18
19
20
21
22
23
24
25
26
27
28
29
30
31
| Rectangle {
property int cellIndex: 0
id: mouseMenu
visible: false
Text {
id: deleteItem
text: qsTr("删除")
MouseArea {
anchors.fill: parent
onClicked: {
videoModel.removeVideo(mouseMenu.cellIndex)
mouseMenu.visible = false
}
}
}
Text {
id: copyItem
text: qsTr("复制")
MouseArea {
anchors.fill: parent
onClicked: {
videoModel.addVideos(videoModel.urlAt(mouseMenu.cellIndex))
mouseMenu.visible = false
}
}
}
}
|
以上就是完整的“右键菜单” QML 描述,在本次 demo 中,我把右键菜单添加到了 GridView 中,但我不确定类似于“菜单”这种组件目前的 UI 层级是否正确。当光标在素材区的某一个视频 cell 上右键时,通过一发偏移计算,得到每次菜单展示的修正后坐标,特别的地方是需要关注 GridView 的 contentY 值。
1
2
3
4
5
6
7
8
9
10
11
12
13
14
15
16
17
18
19
20
21
22
23
24
25
26
27
28
29
30
31
32
33
34
35
36
37
38
39
40
41
42
43
44
45
46
47
48
49
50
51
52
53
54
55
| Component {
id: cell
Column {
Image {
id: coverImg
source: asset.coverImage
visible: false
}
Rectangle {
id: coverContainer
visible: false
}
OpacityMask {
id: mask
source: coverImg
maskSource: coverContainer
MouseArea {
hoverEnabled: true
acceptedButtons: Qt.LeftButton | Qt.RightButton
onClicked: (mouse) => {
if (mouse.button === Qt.LeftButton) {
selectedVideo(asset.url)
}
if (mouse.button === Qt.RightButton) {
var adjustX = 0
var adjustY = 0
if (index % 2) {
adjustX = index % 2 * listView.cellWidth
}
if (index / 2) {
adjustY = index / 2 * listView.cellHeight
if (index % 2) {
adjustY = (index - 1) / 2 * listView.cellHeight
}
}
mouseMenu.x = adjustX + mouseX - 10
mouseMenu.y = adjustY + mouseY - listView.contentY - 10
mouseMenu.visible = true
mouseMenu.cellIndex = index
}
}
onExited: {
mouseMenu.visible = false
}
}
}
}
}
|
这里还有一个 bug,应该要做到当检测到菜单的右值超出了 window 应该要对 x 值减去一个宽度单位,把菜单手动再进行一次偏移,这样就不会出现内容被遮挡的问题了。
在这里又引发出了我对 GridView 内容刷新的困惑。我估计可能是因为 Qt 想要降低视图刷新的成本,手动要求开发者在对视图进行刷新时插入 beginInsertRows() 和 endInsertRows() 方法来协助 Qt 进行视图刷新的计算,除此之外并未提供其它的视图刷新方式。
beginInsertRows() 要求开发者在每次执行视图刷线前都要手动给到刷新的数据范围,比如此时我要复制一个视频,那被刷新的数据源就是“最后一个 index”和“最后一个 index + 1”,需要手动管理被刷新的索引位置。这点我个人是非常喜欢的,目前暂未看到是否 Qt 真的会根据传入的索引范围进行局部刷新,如果真的是局部刷新,这部分的性能开销应该会非常低,好过 reloadData()。
播放区
播放器区的 UI 主要由 Video 和通过 Rectangle 自定义的控制条组成。
1
2
3
4
5
6
7
8
9
10
11
12
| import QtQuick 2.0
import QtMultimedia
Rectangle {
Video {
id: video
}
ControlBar {
id: controlBar
}
}
|
其中自定义的控制条的 ControlBar QML 如下:
1
2
3
4
5
6
7
8
9
10
11
12
13
14
15
16
17
18
19
20
21
22
23
24
25
26
27
28
29
30
31
32
33
34
35
36
37
38
39
40
41
42
43
44
45
46
47
48
49
50
51
| Rectangle {
id: root
signal playButtonClicked()
signal preButtonClicked()
signal nextButtonClicked()
property bool isPlay: false
property double currentTime: 0
property double totalTime: 0
property double progressValue: 0
Column {
Row {
Rectangle {
id: preButton
Image {
id: preButtonImg
source: "qrc:/img/image/player-track-prev.png"
fillMode: Image.PreserveAspectFit
ColorOverlay {
anchors.fill: preButtonImg
source: preButtonImg
color: "white"
}
}
}
Rectangle {
id: playButton
}
Rectangle {
id: nextButton
}
}
Row {
id: progreessBarContainer
ProgressBar {
id: progressBar
value: progressValue
}
Label {
text: formatterTime(currentTime) + "/" + formatterTime(totalTime)
}
}
}
}
|
文档中提供的 icon 均为黑色,但给的 demo 视频中展示的却是白色,不得不说作者真是个小可爱呐!使用 ColorOverlay 组件即可完成,不过该组件同样在 Qt6 中被移除了,按照前文的方式下载过 Qt5 组件即可。
同步播放器和进度条进度我原本想通过对 progressValue 进行 setter 方法重载,查了一发资料没人说过这个问题,尝试过后才发现原来默认 property 是响应式的,当 QML 组件和 property 关联后,当 property 值发生变换对应的 QML 组件也会发生变化。
这里还需要新增三个控制按钮“快退”、“播放”和“快进”的信号,当光标点击这三个按钮后自动发射对应信号到播放器上。定义和发射信号的方式都比较简单,并没有我当初接触 Qt 时得设置 target 和 connet 等。在对应的 QML 组件上定义到信号函数后,再到对应按钮下的 MouseArea onClicked 信号中发射信号即可。
1
2
3
| signal playButtonClicked()
signal preButtonClicked()
signal nextButtonClicked()
|
1
2
3
4
5
6
7
8
9
10
11
| Rectangle {
id: preButton
Image {
id: preButtonImg
}
MouseArea {
onClicked: {
preButtonClicked()
}
}
}
|
而对于播放器 Video 组件来说需要做的事情也不复杂性,无非是在各个信号方法中对 ControlBar 的相关属性进行赋值,即可同步修改 ControlBar UI。
1
2
3
4
5
6
7
8
9
10
11
12
13
14
| Window {
title: qsTr("VideoEditorPlayer")
Player {
id: player
}
Gallery {
id: gallery
onSelectedVideo:(videoUrl) => {
player.playWithVideoUrl(videoUrl)
}
}
}
|
至此,我们就完成了文档中所要求的所有功能,但我依旧不满如此。既然做的事情一个播放器 demo,那么这个进度条自动隐藏和展示的功能要补上才算得上是一个较为完整的 demo。
而对控制条进行自动隐藏和展示,主要是利用了 ControlBar 的 visible 属性,并通过使用 Timer 组件进行延时控制。
1
2
3
4
5
6
7
8
9
| Timer {
id: controlBarTimer
interval: 4000
repeat: false
running: false
onTriggered: {
controlBar.visible = false
}
}
|
接着给 Video 组件新增鼠标位置检测,一旦光标进度播放器区域后,自动展示 ControlBar
1
2
3
4
5
6
7
8
9
10
| MouseArea {
anchors.fill: parent
hoverEnabled: true
onPositionChanged: {
if (video.playbackState === MediaPlayer.PlayingState) {
controlBar.visible = true
controlBarTimer.start()
}
}
}
|
拖拽
在观察剪映专业版 app 过程中发现,对窗体进行缩放过程中有部分区域的宽或高不变,部分区域会随着窗体的缩放而变化。一开始以为是某个属性的变化,后来经过一发尝试后发现,仅需固定部分区域宽度,并让其它区域的“左”或者“右”设置为该固定宽度的区域上。
限制窗体整体大小仅需 minimumWidth 即可。
1
2
3
4
5
6
7
8
9
10
11
12
13
14
15
16
17
18
19
20
21
22
23
24
25
26
27
28
29
30
31
32
33
| Window {
width: 640
height: 400
visible: true
title: qsTr("VideoEditorPlayer")
color: "black"
minimumWidth: 640
minimumHeight: 400
Player {
id: player
height: parent
anchors.top: parent.top
anchors.bottom: parent.bottom
anchors.right: gallery.left
anchors.left: parent.left
anchors.rightMargin: 10
anchors.margins: 10
}
Gallery {
id: gallery
width: 175
height: parent
anchors.top: parent.top
anchors.bottom: parent.bottom
anchors.right: parent.right
anchors.margins: 10
onSelectedVideo:(videoUrl) => {
player.playWithVideoUrl(videoUrl)
}
}
}
|
总结
第一次较为完整并成体系的 Qt 桌面应用实战,整体效果而言比之前使用 Qt Widget 的开发方式直观快速了许多,但对 Qt 整体的工程目录组织还是理解到不位,总是觉得正常的目录组织并不是我这样的方式,后续在 CMake 部分会继续加强。Qt 如何导入和使用第三方组件也需继续学习。
对于 QML 组织 UI 的方式很惊艳,虽然之前也有尝试过其它的跨端 UI 组织方式,但目前来说还是相对满意的,有种预感后续可能会纠结在 JS 和 C++ 的数据类型传递上,也没有引入到更多的平台差异性 framework,希望接下来再写的 demo 过程中能够有更多不一样的体会。